Nota
Haz clic en aquí para descargar el código de ejemplo completo o para ejecutar este ejemplo en tu navegador a través de Binder
Regresión logística Clasificador de 3 clases
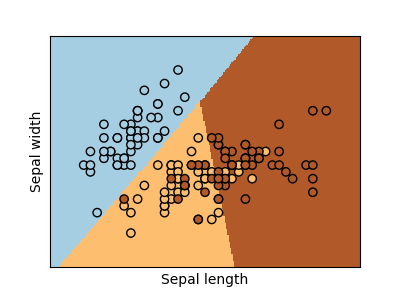
A continuación se muestran la frontera de decisión de los clasificadores de regresión logística en las dos primeras dimensiones (longitud y anchura del sépalo) del conjunto de datos iris. Los puntos de datos están coloreados según sus etiquetas.

Salida:
/home/mapologo/Descargas/scikit-learn-0.24.X/examples/linear_model/plot_iris_logistic.py:46: MatplotlibDeprecationWarning: shading='flat' when X and Y have the same dimensions as C is deprecated since 3.3.  Either specify the corners of the quadrilaterals with X and Y, or pass shading='auto', 'nearest' or 'gouraud', or set rcParams['pcolor.shading'].  This will become an error two minor releases later.
  plt.pcolormesh(xx, yy, Z, cmap=plt.cm.Paired)
print(__doc__)

# Code source: Gaël Varoquaux
# Modified for documentation by Jaques Grobler
# License: BSD 3 clause

import numpy as np
import matplotlib.pyplot as plt
from sklearn.linear_model import LogisticRegression
from sklearn import datasets

# import some data to play with
iris = datasets.load_iris()
X = iris.data[:, :2]  # we only take the first two features.
Y = iris.target

# Create an instance of Logistic Regression Classifier and fit the data.
logreg = LogisticRegression(C=1e5)
logreg.fit(X, Y)

# Plot the decision boundary. For that, we will assign a color to each
# point in the mesh [x_min, x_max]x[y_min, y_max].
x_min, x_max = X[:, 0].min() - .5, X[:, 0].max() + .5
y_min, y_max = X[:, 1].min() - .5, X[:, 1].max() + .5
h = .02  # step size in the mesh
xx, yy = np.meshgrid(np.arange(x_min, x_max, h), np.arange(y_min, y_max, h))
Z = logreg.predict(np.c_[xx.ravel(), yy.ravel()])

# Put the result into a color plot
Z = Z.reshape(xx.shape)
plt.figure(1, figsize=(4, 3))
plt.pcolormesh(xx, yy, Z, cmap=plt.cm.Paired)

# Plot also the training points
plt.scatter(X[:, 0], X[:, 1], c=Y, edgecolors='k', cmap=plt.cm.Paired)
plt.xlabel('Sepal length')
plt.ylabel('Sepal width')

plt.xlim(xx.min(), xx.max())
plt.ylim(yy.min(), yy.max())
plt.xticks(())
plt.yticks(())

plt.show()
Tiempo total de ejecución del script: ( 0 minutos 0.091 segundos)
